How Do You Know When Your Canning Jars Are Sealed
This post may contain affiliate links, view our disclosure policy for details.

Bound to Recipe
In this step-by-step film tutorial, I'll show you how like shooting fish in a barrel canning bone broth at home is. In just a few elementary steps you can have a lot of os broth canned and stored at room temperature for months. Follow the picture tutorial or detect the printable carte at the finish of this post.
Every fall, I make a huge pot of bone broth (or a few of them). In the past, when we brought habitation a deer, we would butcher the deer, get out the meat on ice for a day or so, and so bundle the meat and send it to the freezer.
These days, I accept one more step and before sending the meat to the freezer – I remove all the basic.
This allows me to make plenty os broth during the fall to last united states of america until the next fall. It besides makes it much easier for me when I desire to cook the meat.
But, there is no fashion that I tin find enough room in the freezer for all this broth and really, I prefer to can it anyway. Let me share why I adopt canning bone broth before nosotros learn how to exercise this…
Canning Os Broth…

Get-go, I take to say that it's oh and then like shooting fish in a barrel to tin can bone broth! If you take a little scrap of experience with a force per unit area canner (bone broth is a depression-acid food and then we have to pressure tin can it) you'll accept this down in no time.
If yous're new to pressure canning, don't worry! I take the step past footstep mail for y'all below and actually, canning bone broth is a great way to offset getting familiar with your canner because, again, it'southward super easy.
Why I Dear Canning Both Broth…
There are a few obvious reasons…
It saves me room in the freezer – oh the abiding freezer real manor struggle! Information technology's a real matter on the modern homestead. Fifty-fifty more so in the fall when yous know that fresh deer meat is coming (if y'all hunt).
Canning the broth makes it possible for me to keep the jars on the shelf at room temperature throughout the year. Information technology's one less thing that has to get in the freezer.
I don't need to thaw it – I am terrible at remembering to thaw stuff. I'll ofttimes go in my kitchen with the intention to cook a meal just to realize that I forgot, notwithstanding over again, to thaw the ingredients.
And so, ane less thing to need to remember to thaw is a huge win in my book. Canning might have some time merely in one case those beautiful jars of canned bootleg os broth are on the shelf they are ready to go anytime.
I can adjust the flavor – this is always ane of the best things about doing things on your own… You lot tin simply do them even so y'all want.
So if I want more black pepper, or more than common salt, or no salt at all, or if I want to add garlic or onion to my broth… Everything and annihilation goes! I can personalize my bone broth nevertheless I want.
It's a expert utilize for the bones – in this homesteading lifestyle, there is very footling waste product. Equally I do this more and more I discover that in that location is a great way to employ many things (like parts of the creature, or rotten vegetables…) that otherwise would be trashed.
I always give deer bones to my canis familiaris. It's a great toy and snack for her, just using the bones in the kitchen to produce one more thing just makes sense.
So I make bone broth for us and so notwithstanding give my dog the bones after I strain the broth.
Information technology saves me money – obviously, it's one less thing to buy at the shop. I already accept the bones, the onions, the carrots, the garlic (from the garden), and water from the well.
I can use the coin that I save to purchase things that I don't currently grow like wheat.
Ok, and so now that nosotros've decided that it'southward a slap-up thought to tin can homemade bone goop, permit's do this! Here is what we are going to go over…
- Equipment that we are going to need.
- Homemade os broth and how to brand it.
- Straining the bone broth earlier canning.
- Preparing the canner and jars.
- How to tin os broth.
- Storing and using canned bone goop.
Equipment that we are going to need…
A large pot – to strain the bone broth into.
A strainer – to strain the bone broth.
A force per unit area canner – bone broth is a low acrid food so we can't process it in a water bathroom. We are going to have to apply a pressure canner. I use a dial canner from Presto. Another canner that is very pop is the All American Pressure Canner which is a weighted estimate canner.
Quart jars – I used quart jars here but of course, you tin can utilize pint jars as well if you'd like.
Lids and bands – yous tin reuse bands if they are in good condition but it's important to utilize new lids to make sure the safety is new and that the jars seal.
A ladle – it will assistance us fill up the jars with the os broth.
Canning utensils – Nosotros will use the funnel and the jar lifters.
A paper towel – to clean the rim of the jar before we close it and process it.
Homemade Os Goop…

I accept another postal service for you on how to make os broth and more than data about all the amazing wellness benefits of os broth.
Brand sure to read that post if you are looking for a recipe for os broth. In this post, nosotros'll concentrate on what to practise with this huge pot of goop after it's ready.
Of course, you tin use some right away. Many people drink a cup of bone broth every morn or every night to support their immune system and for all the other benefits of bone broth.
Even so, if yous are reading this information technology's probably because you desire to learn how to preserve some of your bone broth and then let's learn how to can bone broth…
Straining the Bone Broth Before Canning…

The first thing that I practice after the os broth is fix is to strain it. You tin, if you'd like, keep the vegetables and can them as well only we need to get rid of the bones.
I choose to not can the vegetables that I used in the broth and just tin the liquid. The vegetables are ordinarily very soft and falling apart afterwards the many hours that I cooked the broth and I prefer to requite them to the chickens.
Another note hither… In some places, you'll find that it'due south suggested that you let your broth cool all the way and then the fat will solidify. After that, it is suggested to remove the fat before yous strain the broth and can it.
I don't personally do this because I utilise deer basic for my broth and there is very little fatty on a deer.
The issue with the fat is that when nosotros process the jars in the force per unit area canner the broth is bubbles inside of the jars and the fat can get between the lid and the rim of the jar and forestall the jar from sealing.
Again, since at that place is very footling fat on a deer I don't bother letting my broth absurd and I don't skim the solid fat (it volition bladder on superlative of the broth), only if you are canning broth that has a lot of fat y'all might desire to take this extra step.
Just remember that if you lot permit your broth cool then you can skim the fat, you are going to have to heat it back up after you strain it and before you can it since information technology's very important to keep like temperatures when canning.
You don't want a cool liquid going into a hot canner. It's a recipe for disaster. Don't ask me how I know this…
Then once my goop is done cooking, I place a strainer over a large pot and strain the broth into that large pot…

You can see that in that location is a little bit of fatty on pinnacle of my broth but not too much. Also, real fat is very good for you then if I have the choice to go on a little bit I prefer to keep information technology.
Preparing the Canner and Jars…

I ordinarily exit the pot of strained broth on the stovetop on low rut merely to keep it from cooling while I set up my canner.
I leave the rack in the canner and fill information technology with 2" of water (once more, I accept a Presto canner. If you are using a different canner y'all might demand to check your transmission and accommodate the amount of h2o according to the instructions) and place it on the stovetop uncovered.
I turn the rut to high and wait a few minutes for the water to reach a simmering temperature (the water in the canner should exist hot but not necessarily humid).

While the water in the canner is heating up I wash my jars with hot h2o and dish lather, then I set them on my counter and make sure non to touch the rim of the jars from this point on.
I also make sure to wash my lids and bands. Nosotros desire everything clean and ready to become.
How to Can Bone Broth…

One time the water in the canner is simmering, I bring my big pot of strained bone broth onto my counter (correct next to my jars) and use the funnel and ladle to fill the jars with the hot broth. Make sure to leave a 1" headspace.
I used quart jars hither but yous can definitely use pints too if y'all'd like. I'll give you processing instructions for both.

Once the jars are filled, utilise a clean paper towel to wipe the rim of the jars…

Then center the lid and shut the jar with the band finger tight (not too tight).

Adjacent, use the jar lifters to lift the jars into the canner. I place them on the rack, making sure they don't touch on each other and close the canner.

Now, the weight is off the vent. I lower the heat only a little bit to medium-loftier and look until I see stalk starting to come out of the vent.
Once steam starts escaping I set my timer for 10 minutes and only allow the canner vent steam.
Subsequently 10 minutes, identify the weight on the vent and watch the punch guess.
For a dial gauge canner, we want the pressure to reach xi pounds. Once it reaches xi pounds, I suit the oestrus to keep the pressure at eleven pounds of pressure and process my quart jars for 25 minutes (20 minutes if y'all are processing pint jars).
If you are using a weighted judge canner, you will want to utilise x pounds of pressure.
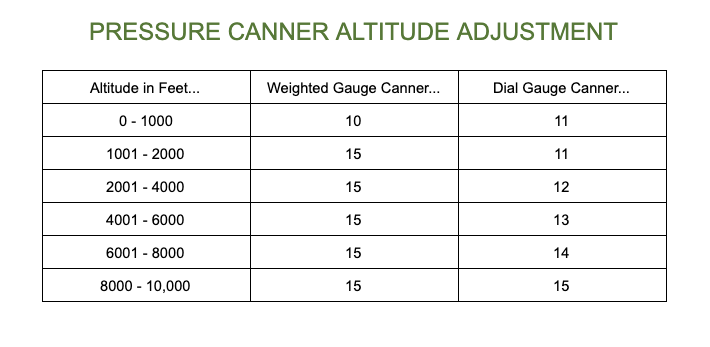
If y'all live in an distance above chiliad feet, you are going to need to adjust your pressure level. Just follow the table below…
For both kinds of canners, the processing time stays the aforementioned.
After 25 minutes of processing, I plow the oestrus off and get out the canner right as it is. I do not remove the weight or motility the canner.
I let it cool slowly to room temperature. This usually takes a few hours just that'due south fine. I but go do something else. Again, when nosotros can we want to be very mindful of temperature and force per unit area changes so we don't crusade a mess (similar jars breaking in the canner, or one-half of the liquid seeping out of the jars. Don't enquire me how I know this…).
When the canner is dorsum at room temperature (and the dial reads 0 force per unit area), I open the lid and leave the jars in the hot water for an boosted 10 minutes.
Recall… Rapid temperature changes = a disaster.
After 10 minutes, I apply my jar lifters to lift the jars out of the canner and set them on a kitchen towel on the counter or on my wooden cutting board (cause the counter itself is usually cold).
I then let the jars cool slowly. I usually leave them overnight, undisturbed on the counter.
Storing and Using Canned Bone Goop…

When the jars are cool I check if they have all sealed by pressing in the centre of the lid. If at that place is no movement there it means that my jars sealed and are ready for storage.
I remove the bands (nosotros don't need them anymore) and wipe the jars earlier I store them on my shelves (cause I don't accept a pantry…).
These jars will last for a very long time. Some say years, some say xviii months. I personally effort to utilize all my canned appurtenances within a twelvemonth. Then the next year, I can a fresh batch and so on.
I'll utilise my canned goop in whatever recipe that calls for beef broth. I personally don't just drink information technology, simply I'll utilise it in many dishes and soups. A lot of times, I'll use it instead of using h2o because it adds great flavour.
For example, I'll use it when I make bulgur or rice instead of using water.
I'll use information technology when I make my BBQ venison neck recipe, when I brand my pulled venison wrap, or when I make my Mediterranean blimp peppers.
These are just a few examples! I hope you liked this tutorial. Make sure to bank check some of my other canning tutorials like how to can meat, how to tin can chicken, and how to can milk.
If you are using a weighted gauge canner and are looking for more specific instructions for your type of canner you lot tin find them here.
Here is the handy canning os broth printable…
Instructions
- After your bone broth is ready, place a strainer over a large pot and strain the goop. Get rid of all the bones and the vegetables yous added when you lot cooked the goop.
- If there is a lot of fat in your broth, you might need to let the goop cool and the fat solidify so you lot can scoop it out. Instructions on how to do that are in the notes below.
- Add together 2'' of h2o to your pressure canner. Prepare it on the stovetop and plow the rut to high. Bring the water to a simmer.
- Wash your jars, lids, and bands with hot soapy water and prepare on the counter.
- When the water in the canner is simmering, apply the funnel and a ladle to fill the jars with the hot goop. Make sure to leave ane'' inch headspace.
- Clean the rim of each jar with a clean newspaper towel.
- Center a hat on each jar and close with the ring finger tight (not too tight).
- Use the jar lifters to lift the jars and place them in the canner on the rack.
- Close the canner and prepare the oestrus to medium-high. Brand sure the weight is not on the vent.
- Watch the vent. When steam starts coming out of the vent prepare your timer to ten minutes and let the vent release steam.
- After ten minutes of venting steam, place your weight on the vent and watch the dial (if y'all are using a weighted gauge canner place your weight at 10 pounds).
- Adjust the oestrus to go along 11 pounds of pressure for a punch gauge canner or 10 pounds of pressure if you are using a weighted approximate canner for 25 minutes for quart jars or 20 minutes for pint jars. Make certain to check the mail for the pressure adjustment table if you lot live above grand feet in elevation.
- When the processing time is upwards, plow the estrus off but do not take the weight off the vent or move the canner. Allow it cool and come dorsum slowly to 0 pound pressure.
- When the canner is back at room temperature (this may have a couple of hours), open the hat.
- Let the jars stay in the hot h2o for 10 more minutes before using the jar lifters to lift them out of the canner.
- Set up your jars on a wooden cutting board or on a kitchen towel on the counter to cool undisturbed overnight.
- Afterwards your jars accept cooled completely, check to see if they have sealed by pressing on the centre of the lid. If there is no movement at that place your jars are sealed and set for storage.
- Remove the bands, wipe the jars and store in the pantry for up to 18 months.
Notes
If your bone broth is very fatty, it might be a good thought to remove some of the fat.
The effect with the fat is that when we process the jars in the pressure canner the goop is bubbling inside of the jars and the fat tin can become between the hat and the rim of the jar and prevent the jar from sealing.
If you choose to remove some of the fat, let your broth cool completely. The fatty will solidify and bladder on top of the goop. You can simply scoop it out with a spoon.
If y'all do that, go alee and strain your broth into another pot and place that pot of strained broth on the stovetop and heat it up before canning.
We desire to make certain we don't place jars with cold broth into a canner of simmering water. When nosotros tin, information technology's always important to keep like temperatures to go along the jars from breaking.
Nutrition Data:
Yield: 1 Serving Size: 1 quart
Amount Per Serving: Calories: 164 Total Fat: 1g Saturated Fatty: 0g Trans Fat: 0g Unsaturated Fat: 0g Cholesterol: 10mg Sodium: 1945mg Carbohydrates: 2g Fiber: 0g Sugar: 2g Protein: 37g

Hi! I'm Lady Lee. I aid homesteaders simplify their homesteading journey while however producing a ton of food! I am a single mother of four, I was born in State of israel and raised in an agricultural district called a Kibbutz. Now I homestead in central NC.
Source: https://ladyleeshome.com/canning-bone-broth/
0 Response to "How Do You Know When Your Canning Jars Are Sealed"
Post a Comment